The Jedi Way: Mastering the Drilling Protocol of the Pure Ceramic Implant
- Andre Chen
- Aug 8, 2025
- 5 min read
Updated: Aug 9, 2025
Some implants are all speed and aggression — one drill, ten seconds, done.
But the Pure ceramic implant? That’s a whole different galaxy.
No self-tapping, no shortcuts, no forgiveness. Just precision, patience, and a surgeon’s touch.
Here’s how I tackled a high-smile-line, bone-tight, central incisor case — using nothing but skill, planning… and a little bit of the Force.
Not All Implants Are the Same
When I was fresh out of dental school at the University of Lisbon — roughly 2003 — I knew plenty of dentists who bragged about how fast they could place dental implants.
“One drill, ten seconds, implant in!” — that was their thing. They even patented something like the Nobel Speedy...
I understood the logic: if you’ve got an apically tapered implant with a very aggressive thread design, you can basically do one drill, and the implant finishes the osteotomy for you. Fast, easy, efficient.
I guess it was the natural evolution from the straight cylindrical implant — now conical, with a tapered apex.
But that’s not the way of the Pure.
Why the Pure Is Different
The Pure is a cylindrical, curved, half-dome implant with a single thread design.
No self-tapping. No self-cutting. Which means… you have to rely entirely on the drilling protocol.
This isn’t the implant for speed demons — it’s the implant for surgeons who enjoy the art of preparation.
The Case
Today I placed a beautiful Pure ceramic implant. The patient was referred by Ágata, a very talented Polish dentist who worked with us for five years. She told me, very briefly, that the patient needed a replacement for a central incisor.
I hadn’t met the patient before — only saw the X-rays and a short note: external and Internal root resorption on tooth 21.....
When she arrived and smiled… I could see everything. High smile line. Very high.
(Go grab those ITI esthetic risk assessment forms — you're immediately in the high‑risk arena.)…..
Which made me nervous, because with that much gingival display, there’s zero margin for error.

The CBCT Surprise
The scan confirmed root resorption on the mesial of 21. Luckily, the attachment of 11 was intact — but there was a small resorption cavity filled with connective tissue.

That immediately sent me to the Denis Tarnow classes in 8w and all the papilla hours!
Of course, now that I’m more experienced, I calmly informed the patient that the distal papilla might shrink, which she accepted well.

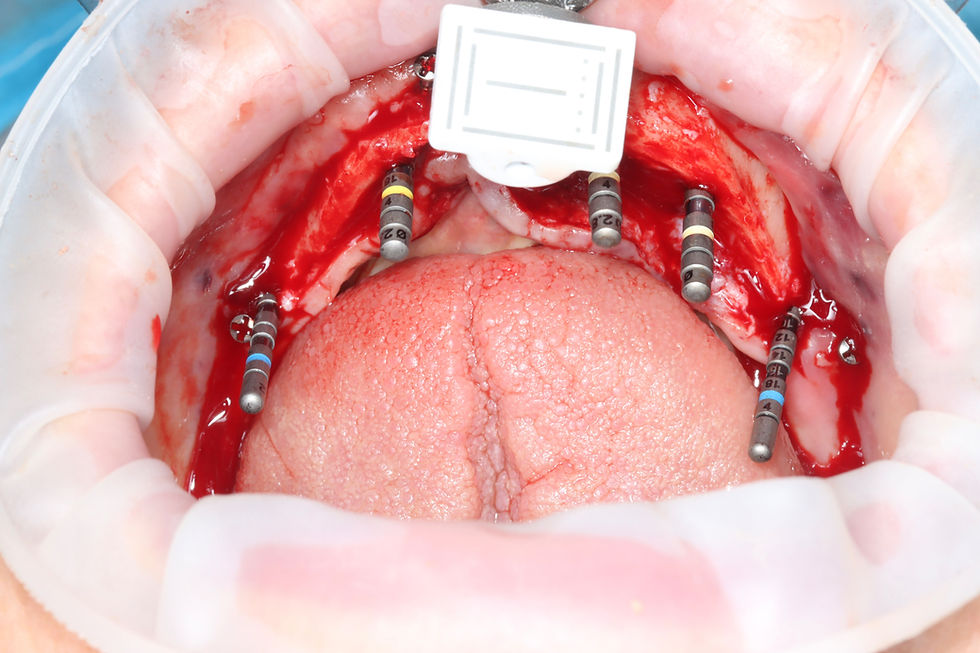
The real challenge ? For a two-piece ceramic Pure implant, 4.1 mm diameter, I had very little bone to work with — fitting it between the nasopalatine canal and the apex of the lateral incisor. Tooth 21 tilted distally, 22 tilted mesially. Space was minimal.
And don’t forget — whereas an apically tapered 3.75 mm implant narrows to roughly 2.5 mm at the apex, the Pure remains a full 4.1 mm throughout.
Precision Over Power
With the Pure, you can’t just jam it in like a BLX, NobelActive, or MIS 7.No aggressive apex. No forgiveness.You have to respect the protocol.
When it comes to immediate implant placement in the anterior region, my post‑grad students at Lisbon University already know my go‑to advice:
“Do it with your eyes closed.”
Whenever I say this, their expressions of surprise — and sometimes terror — are absolutely priceless.
Close your eyes and use the Force. Well… maybe not completely blindfolded — but close enough for Master Yoda‑level control.
Step-by-Step: The Jedi Drilling Protocol

Aim for the palatal wall.
Start the spear drill at 45° toward the palatal wall, start at the apex of the tooth and slide to the palatal, engaging native bone. Correct toward the cingulum for a screw-retained crown.
2.2 mm drill — enter at about 45°, same movement. Careful: it tends to slip.
2.8 mm drill (Straumann yellow) — now at 25°, aligning closer to the cingulum.
Final 3.5 mm drill — before the straight drill, use the conical BLT drill to full depth. This gives the perfect geometry for stability.

Remember :
💡 For immediate placement, aim for ≥ 35 Ncm torque and ISQ > 64.
💡 Using a conical bur for a cilidrical implant allows you to get that primary stability at the apex, but its tricky because a very narrow one the dome apex of the implant might not bite the osteotomy
💡 The stability also comes from mesial distal anchorage and the flared collar at the crest
Tissue Level Considerations
The Pure is a tissue-level tulip 🌷 like implant. So it means that the platform flares at the coronal , it is supposed to be supracrestal ,
However, in immediate placement, you need to position it slightly subcrestal to compensate for the predictable post-extraction bone remodeling.
This remodeling process has been well documented in landmark studies:
Araújo & Lindhe (2005) demonstrated that following tooth extraction, the bundle bone is rapidly resorbed and replaced by woven bone — leading to a significant reduction in ridge height and width, especially on the buccal side.(Araújo MG, Lindhe J. Dimensional ridge alterations following tooth extraction. An experimental study in the dog. J Clin Periodontol. 2005;32(2):212-8.)
Cardaropoli et al. (2003) provided further insight, showing that the majority of dimensional changes occur within the first 8 weeks, and that buccal bone plate thickness strongly influences the degree of horizontal loss.(Cardaropoli G, Araújo M, Lindhe J. Dynamics of bone tissue formation in tooth extraction sites. An experimental study in dogs. J Clin Periodontol. 2003;30(9):809–818.)
In immediate placement, position the collar 1–2 mm above the buccal bone. If needed, slightly enlarge the crest for proper seating.

Insertion: Where the Force Comes In
With its dome-shaped apex and gentle threads, the Pure needs a special insertion technique:
Start at 45° to engage the first threads.
Slowly rotate toward the prosthetic axis, letting it glide into the osteotomy.

Skip proper drilling and it simply won’t seat. The Pure demands the classic surgeon’s patience — precise osteotomy, tight fit, perfect positioning.

The Reward
When it’s in… the Pure sits in harmony with the surrounding anatomy.
It’s slow dentistry. It’s precise dentistry. It’s beautiful dentistry.
A true Jedi technique. 🦷✨


References
Araújo MG, Lindhe J. Dimensional ridge alterations following tooth extraction: an experimental study in the dog. J Clin Periodontol. 2005;32(2):212–218.
Cardaropoli G, Araújo M, Lindhe J. Dynamics of bone tissue formation in tooth extraction sites: an experimental study in dogs. J Clin Periodontol. 2003;30(9):809–818.
Martin WC, Chappuis V, Morton D, Buser D. Preoperative risk assessment and treatment planning for optimal esthetic outcomes. In: ITI Treatment Guide, Vol. 10: Implant Therapy in the Esthetic Zone: Current Treatment Modalities and Materials for Single‑tooth Replacements. Berlin: Quintessence Publishing; 2017. straumann.
Comments